Recently our cell providers started charging nearly 4$ per month just to keep the panel connected to the network… This unavoidable subscription trend is driving me nuts so I have put together an opensource alternative and you can build one too for just 10$.
There’s a remote location with the Paradox alarm panel and GSM module guarding it. Wi-Fi emerged out of nowhere and I hate paying more than I need.
Few simple requirements
for this implementation
- Low power (this one uses ±1W)
- Low maintenance (no moving parts or SD card storage)
- Low cost (all considered it’s about 10$)
- Must “punch through” the firewall–e.g. no port forwarding on the router required
- Secure data in transit (VPN connected)
Based on above I had to ditch a “local to the panel server” idea (even RPi plugged in somewhere is too much)–keeping it easily accessible, plugged in without any UPS etc., maintained with degrading storage and all that jazz was not on my list. Wanted to spend as little as possible, so ESP (which I have several laying around) was a perfect choice. My HAOS was spun on a remote server in a VM, so data in transit must be encrypted (be aware! If you expose this externally and do not encrypt the data in transit–anyone with enough knowledge will gain access to your alarm panel!!!).
If you want a finished device
✅ I can build it for you!
Available here: https://link.geriaune.pro/gn-alarmoo
Few bucks for connector, a magnet from an old 2.5″ HDD and an hour of 3D printing later I have a working prototype:
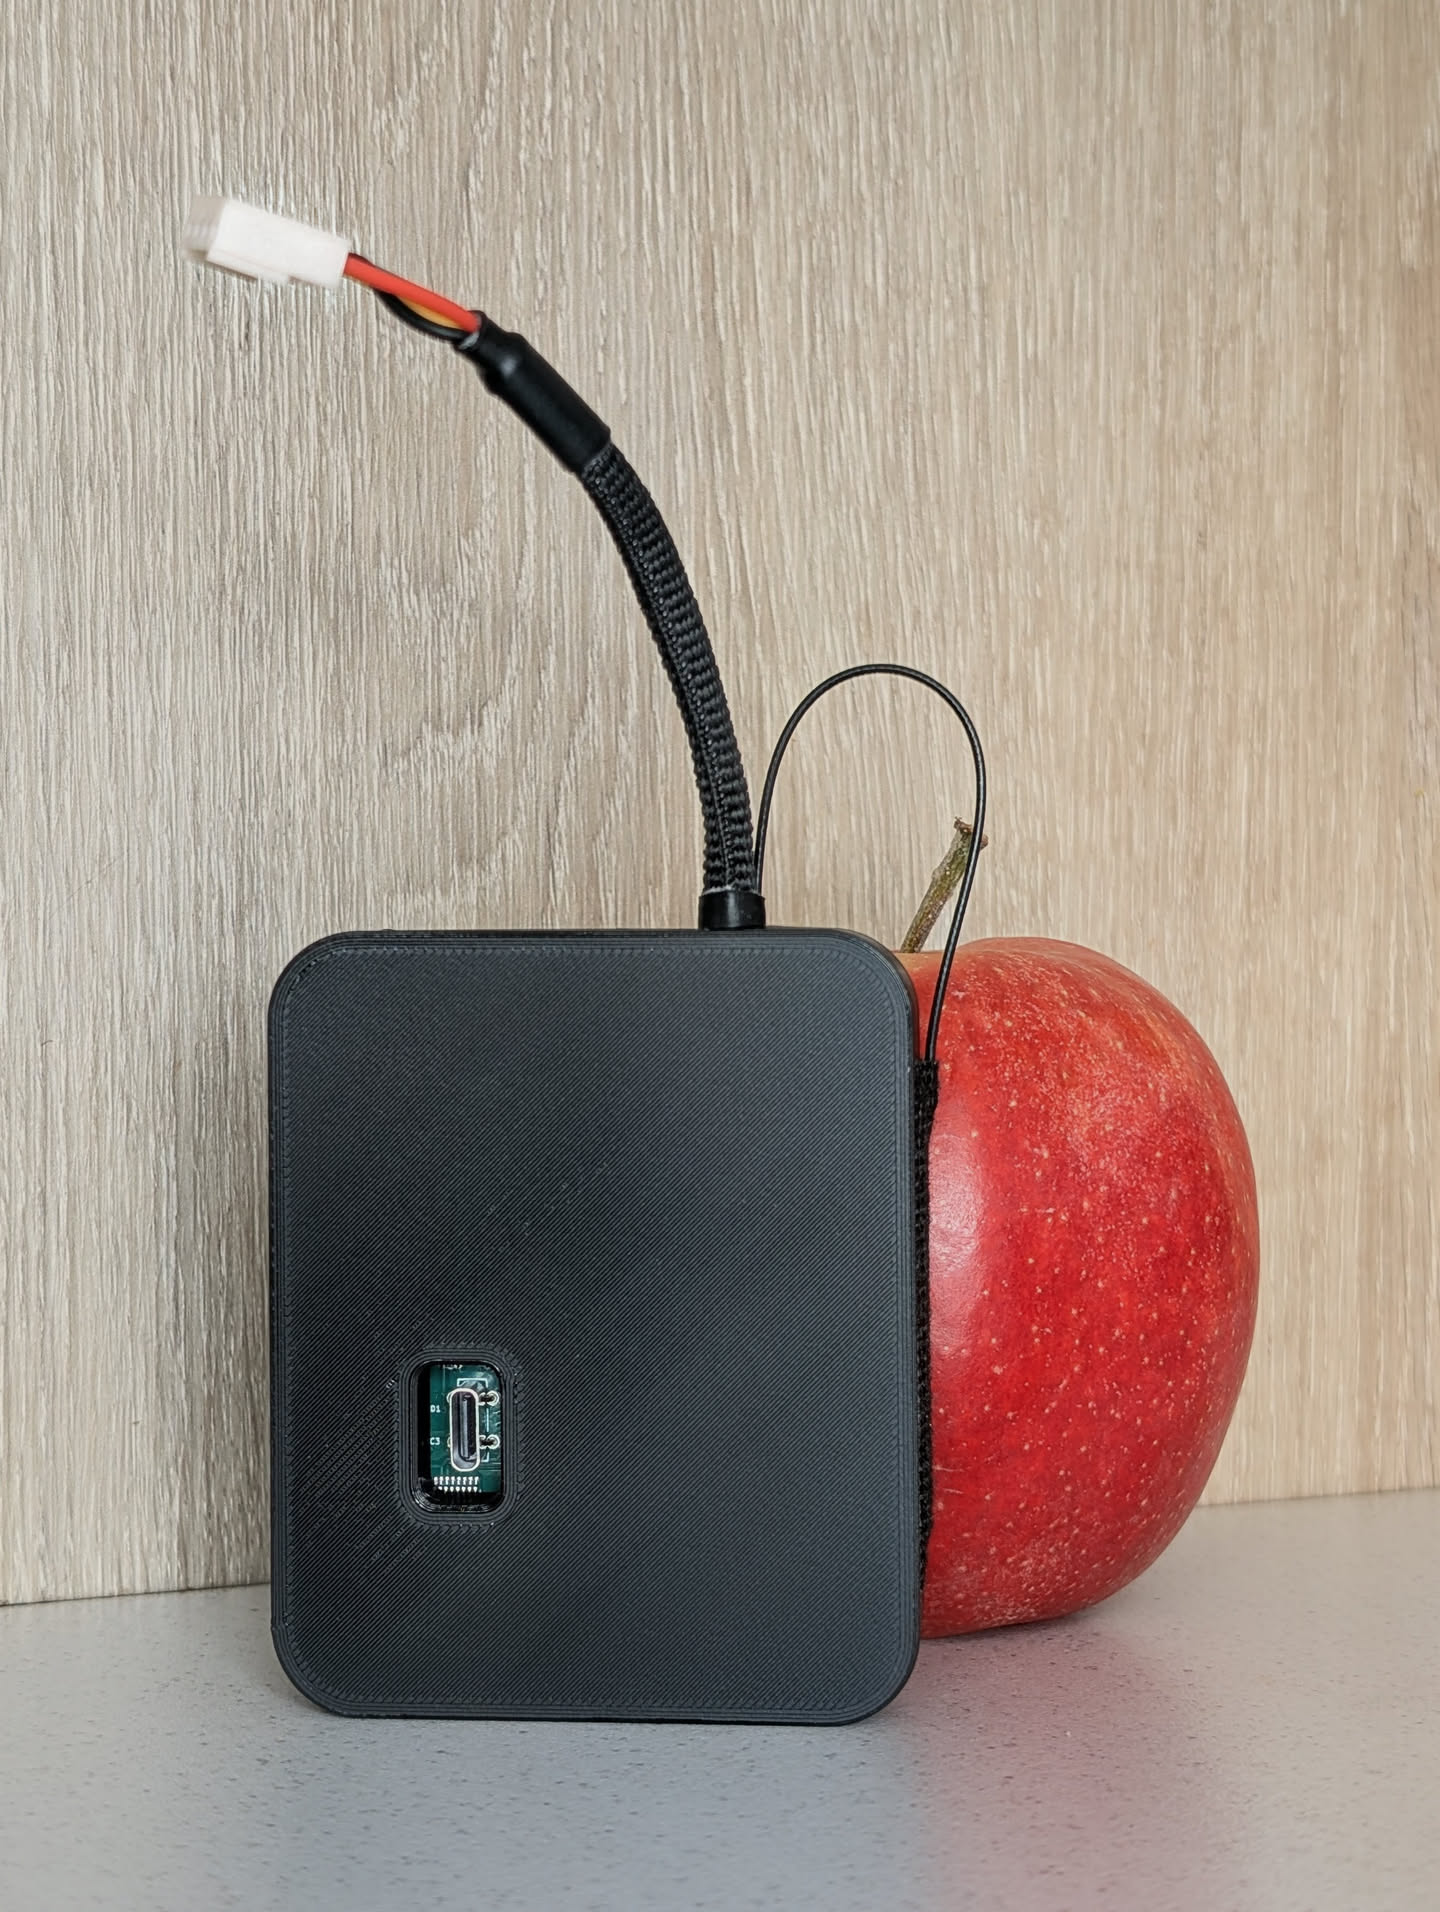
The ESP module I had was intended to run a screen so the footprint is bigger. Currently waiting for a slimmer module and will also try to use onboard USB pins as serial comms for easier connectivity.
If you want to build it yourself
you can put it together, using:
- ESP32-S3 module with at least 8MB flash and 8MB PSRAM (you need this specific one to get VPN integration working reliably). ESP32-S3 N16R8 module is my choice (look for “S3-N16R8 Socket” with provision for external antenna): http://link.geriaune.pro/K0kcc
- External antenna (“with Seat”): http://link.geriaune.pro/MzzeZ (Optional, depends on the wifi and alarm panel placement). For normal indoor use it should not be required, but id doesn’t hurt 🙂
- Cable from the Paradox alarm panel to the ESP
- Some wires from alarm panel to buck and buck to ESP. It will not pull much power (I have measured around 1W) so 0.25mm² (24AWG) is enough: http://link.geriaune.pro/fESna
- 4 pin connector with contacts for the panel. it’s a Molex KK series connector, but just use simple Dupont ones or a clone: https://link.geriaune.pro/4pjst
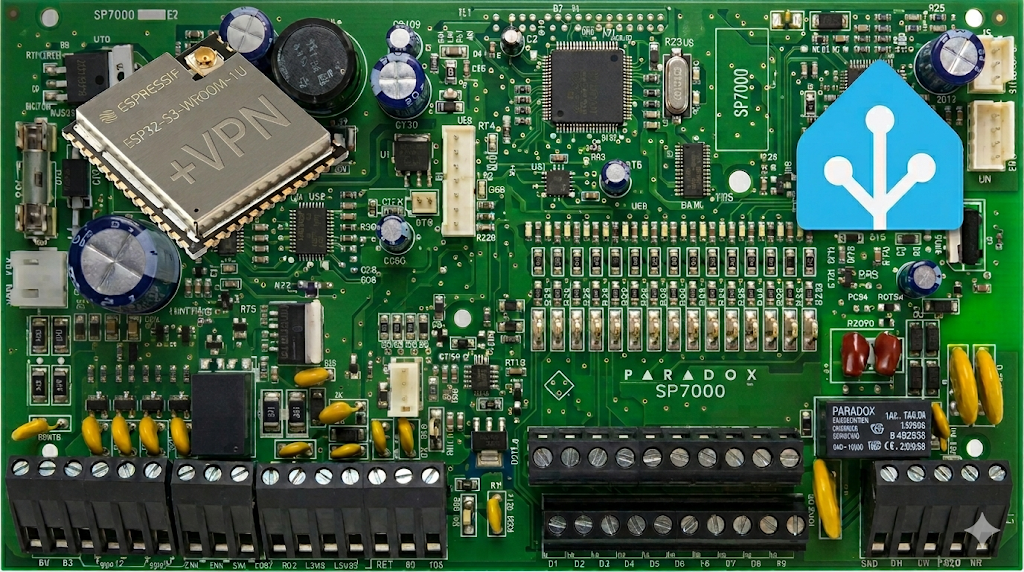
- Panel pinout (on some panels TX/RX can be reversed so swap these around if you encounter connection issues. The below connection is confirmed for the SP7000 panel):
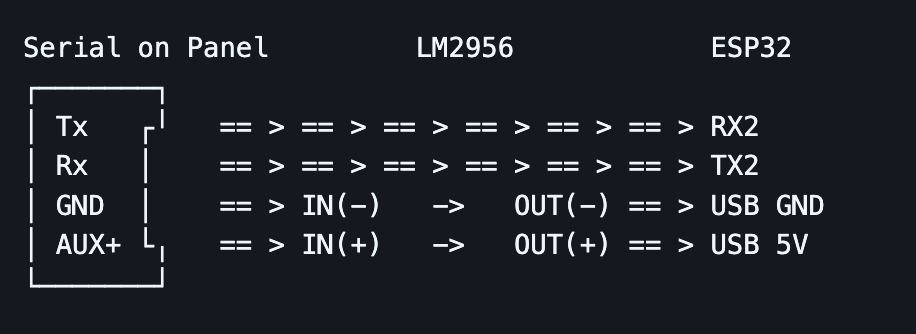
- Buck step-down to lower voltage from panel’s +12VDC to module’s +5VDC: https://link.geriaune.pro/dcdown
- USB Type-C connector for the ESP module (with data pins): http://link.geriaune.pro/ZZc6R
- 3D printed housing for the ESP module (Optional)
- Some shrink tube or braided sleeve to make it look better, also glue a small magnet to the housing (to fix the finished device inside an alarm panel’s housing box) but it’s completely optional…
Since you found this article
I assume you know your way around Home Assistant, plugging the module into the alarm panel etc.
Working software stack required for this:
- Home Assistant (I have used HAOS from the .qcow2 image)
- ESPHome HA App
- MQTT Broker (“Mosquitto broker” App in HA works fine)
- Tailscale HA App
- Tailscale account (Free is sufficient) or Headscale self-hosted server (if you really value your data–my preferred)
VPN part (e.g. Tailscale/Headscale) is not required if you run an isolated network at the same location and you’re not exposing ESP to the internet. But it’s highly recommended.
Before you proceed
make sure your panel is not locked (it’s not using any custom firmware, it runs an older firmware without serial port encryption etc.), this module is the only one connecting to the serial interface (IP150/GSM modules will not work simultaneously–it can only be one!). You can work with basic electronics (and soldering, if you opt for the DIY route). So a general disclaimer to be careful, as it’s very easy to mess things up. I am not accountable for anything you do.
Sources
- https://github.com/esphome/esphome (Home Assistant App for ESP32 firmware control)
- https://github.com/ParadoxAlarmInterface/pai (Home Assistant App to get the data from the panel). It connects to the ESP and listens for data payload, interprets it and pushes data to MQTT Broker for Home Assistant to pick it up.
- https://github.com/Csontikka/esphome-tailscale (Tailscale/Headscale client for ESP to have that encrypted communication between Home Assistant and panel)
- https://github.com/oxan/esphome-stream-server (basically exposes local Paradox alarm panel’s UART to connected Wi-Fi on a specified port)
- https://github.com/geriaune/gn-alarmoo (repository for this ESPHome setup)
Read carefully through these if you want extra options or functionality. I’m using what was required for a specific task and your task might be different 🙂 I will try to keep up with breaking changes–there could always be something with this mesh-up of services, but let’s hope for the best! 😀 Check my repo for updates or comments. Thanks!
Gotchas!
the usual format to get things working. Everything else is either default or I already forgot, but luckily this page has an edit button 🙂
in ESPHome device configuration:
tailscale:
  auth_key: !secret tailscale_auth_key
  hostname: "paradox"
  login_server: "http://vpn.yourserver.com:8080"
create “tailscale_auth_key: “hskey-auth-*****” secret in ESPHome’s secrets. “login_server” is not required for tailscale, only required for headscale self-hosted setup, also you cannot use https login domain as it’s not supported in the tailscale client on esp yet (at the time of writing).
wifi:
  ssid: !secret wifi_ssid
  password: !secret wifi_password
  use_address: "100.64.0.X"
required for ESPHome communication. Set this in the config AFTER you flash the device. It will be in the ESP log, Tailscale/Headscale CLI or WEB UI. IP will be used to check logs and push updates from ESPHome App in HA. For “set and forget” setup–it’s not required 🙂
- Every time you re-authenticate a device or re-flash ESP with new firmware from PC–a new IP will be assigned from the tailnet, so you will need to update IP in the ESPHome config for the device, PAI App and ESPHome integration in HA.
- VPN uses another network layer on top of everything already in place, so trying to troubleshoot DNS and FQDN issues was a waste of my time… Just use IP everywhere or let me know how to overcome HAOS Docker DNS stubbornness.
HA Settings -> Apps
ESPHome:
set “Use ping for status”
By default the dashboard uses mDNS to check if nodes are online. This does not work across subnets unless your router supports mDNS forwarding or avahi. Enabling this option will use ICMP ping to check if nodes are online.
Mosquitto broker:
when stopped, add a user “pai” and create a strong password. Start the service.
Paradox Alarm Interface (PAI):
CONNECTION_TYPE set to “IP”
IP_CONNECTION_HOST set to VPN IP (100.64.0.X) or wifi IP if not using VPN.
IP_CONNECTION_PASSWORD set to panel’s password (if using anything other than default “paradox”)
toggle “Show unused optional configuration options” and enable “IP_CONNECTION_BARE” option. Without this module will not connect to the alarm panel.
set MQTT_ENABLE and change MQTT_USERNAME and MQTT_PASSWORD to whatever you have set in the MQTT App.
set MQTT_HOST to an internal Home Assistant IP (e.g. 192.168.0.222 or whatever it is. You can find it in Terminal by typing:
$ ha network infousing 127.0.0.1 did not work for me, probably because of the docker/host network layer and all that bullsh|t…
set 10000 as port in the “Network” section at the bottom.
start the service and check its logs. You should see it connecting to the panel, connecting to MQTT broker etc.:
...
INFO     - PAI.paradox.paradox - Connecting to interface
INFO     - PAI.paradox.paradox - Using IP Connection
INFO     - PAI.paradox.connections.ip.connection - Connecting. Try 1/3
INFO     - PAI.paradox.connections.connection - Connection established
INFO     - PAI.paradox.paradox - Connecting to Panel
INFO     - PAI.paradox.paradox - Panel Identified SP7000 version 7.0 build -1
INFO     - PAI.paradox.paradox - Initiating panel connection
INFO     - PAI.paradox.hardware.spectra_magellan.panel - Installer login
INFO     - PAI.paradox.hardware.spectra_magellan.panel - Authentication Success
INFO     - PAI.paradox.paradox - Connection OK
...
Wrapping Up
at this point you should see MQTT being filled with paradox zones, sensors etc.
in HA Settings -> Devices and services you should have “ESPHome” and “MQTT” integrations. Under these look for a “paradox” device, also your panel should be visible with all the sensors/zones/PGMs and you should be able to add required controls to the HA Dashboard.
Congrats! Your Paradox alarm system is now smart!